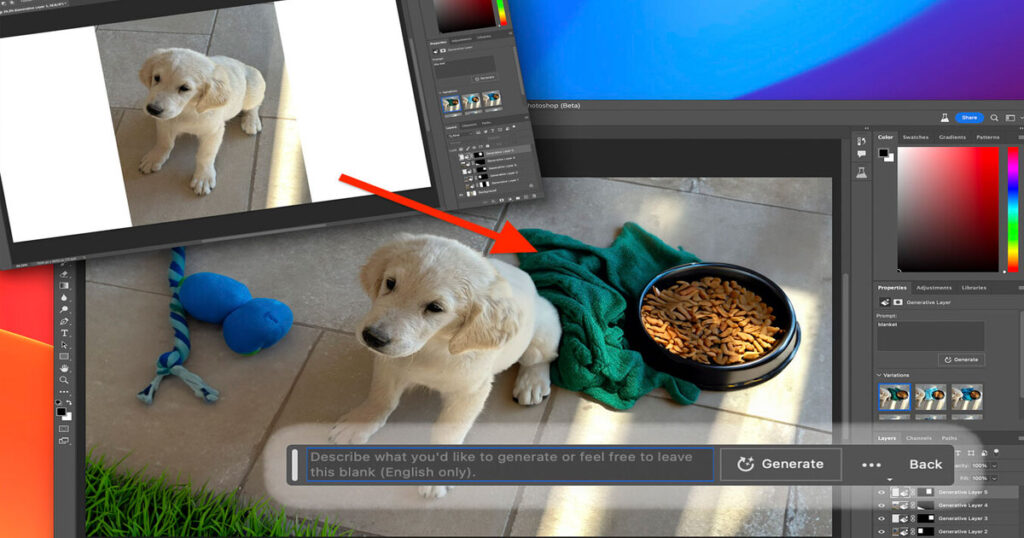
Adobe Photoshop has long been a staple in the creative toolkit of photographers, designers, and digital artists. With its continuous updates, the software keeps introducing innovative features that enhance the editing experience.
One of the most exciting additions is the Generative Fill feature, which harnesses the power of artificial intelligence to generate or fill in content based on your selections.
This article will guide you through the process of accessing and effectively using the Generative Fill tool in Photoshop.
What Is Generative Fill?
Generative Fill is an advanced AI-powered feature in Photoshop that allows users to create content seamlessly.

Whether you want to remove objects from an image, fill in backgrounds, or even create entirely new elements, Generative Fill uses machine learning algorithms to analyze your image and generate appropriate content based on the surrounding area.
This can dramatically speed up workflows and inspire creative possibilities.
Accessing Generative Fill in Photoshop
Step 1: Ensure You Have the Right Version
Generative Fill is available in Adobe Photoshop (version 2024 and later). To access this feature, ensure your software is updated to the latest version. You can do this by opening the Creative Cloud application and checking for updates.
Step 2: Open an Image
Launch Photoshop and open the image you want to edit. You can do this by going to File > Open and selecting the desired file.
Step 3: Make a Selection
To use Generative Fill, you first need to make a selection around the area you wish to edit. You can use various selection tools available in Photoshop, such as:
- Lasso Tool: For freehand selections.
- Rectangular Marquee Tool: For rectangular selections.
- Quick Selection Tool: For quickly selecting an object based on color and texture.
- Pen Tool: For precise selections along complex edges.
Once you’ve selected the area you want to edit, ensure your selection is active (you should see the “marching ants” outline around your selection).
Step 4: Access Generative Fill
With your selection made, navigate to the top menu and select Edit > Generative Fill. Alternatively, you can right-click on the selection and choose Generative Fill from the context menu.
Step 5: Configure Settings
When you access Generative Fill, a dialog box will appear, offering you several options:
- Prompt: This is where you can enter a description of what you want to generate. For example, if you want to fill a blank space with grass, you can type “green grass.”
- Fill Settings: You can choose between options like “Content Aware” or “Generate,” depending on your needs.
- Output Options: Decide whether to create a new layer or fill in the selected area directly.
After configuring your settings, click on the Generate button.
Using Generative Fill Effectively

1. Experiment with Different Prompts
The effectiveness of Generative Fill often depends on how you phrase your prompts. Be specific but concise.
Experiment with various keywords to see how the generated results vary. For example, instead of just “tree,” try “tall oak tree with lush green leaves” for more tailored results.
2. Refine Your Selections
The quality of the generated content can be influenced by the precision of your selection. Take the time to refine your selections to ensure that Photoshop understands exactly what you want to fill.
3. Use Layer Masks
After generating content, consider applying a layer mask. This allows you to blend the new elements into the original image seamlessly, giving you more control over the final look.
4. Combine with Other Tools
Generative Fill can be used in tandem with other Photoshop tools. For example, after generating new content, you might want to adjust colors using Hue/Saturation or Curve adjustments to ensure everything matches perfectly.
5. Undo and Redo
Don’t hesitate to use the Undo (Ctrl+Z) or Redo (Ctrl+Shift+Z) commands if the results aren’t what you expected. Generative Fill is a powerful tool, but sometimes it may require a bit of tweaking to get it just right.
Conclusion
Generative Fill in Photoshop opens up a realm of creative possibilities, allowing users to edit images more effectively and efficiently. By understanding how to access and use this feature, you can elevate your photo editing skills and produce stunning results with ease.
As with any tool, practice is key—experiment with different prompts and selections to discover the full potential of Generative Fill. Embrace the innovation, and let your creativity flow! For more Generative AI information check the nowstartai.
